learning handstands can be overwhelming. there is a huge amount of information out there; how do you know what you should. be doing? if you’re anything like me, it might feel like there are more “essential” drills than you could do in a lifetime.
building a rewarding and sustainable practice for yourself will allow you to train with intention and consistency. this is where you will get results, and also find enjoyment in the journey.
to break down the skill into trainable components, we have to know what we’re asking our bodies to do. let’s look at the biomechanics of a handstand.

if you want an in-depth explanation of the physics of handstands, check out these articles:
https://www.chrisgatti.com/blog/2019/10/6/a-simple-model-of-the-handstand
https://abrown18-68137.medium.com/a-simple-model-for-the-handstand-1c775286c3bf
otherwise, these are the basics:
in a handstand, the body forms an inverted pendulum: the individual has their hands flat on the floor, the arms, body, and legs are inverted and straight, and the point of rotation of the pendulum is the wrists.
the body remains rigid and forms a straight line from wrist to feet. rotation occurs at the wrist joint to maintain the balance of your centre of mass (hips) over the axis of rotation (the middle of your hand). this happens by pushing your fingers or the heel of your hand into the ground.
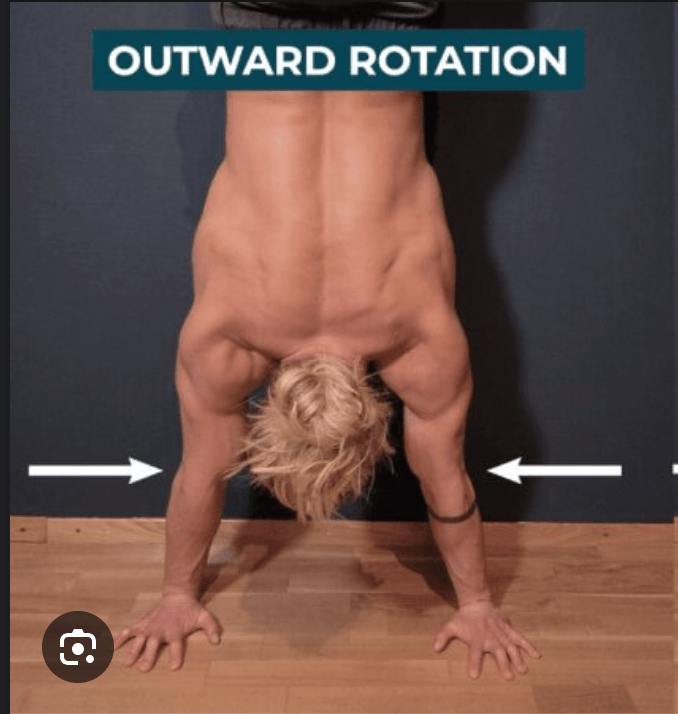
the shoulders are in maximum extension (wrists directly overhead). to achieve stability here, the shoulder is externally rotated (inside of the bicep towards the ear) and the scapular is in protracted (away from the middle of the back) and elevated (towards the top of the head).
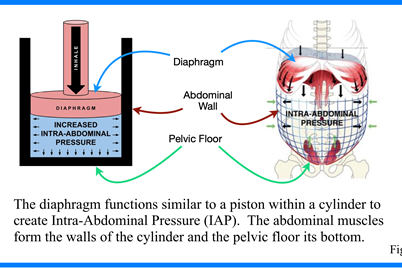
to keep your spine as one still segment requires increased intra-abdominal pressure. the diaphragm, pelvic floor, transverse abdominals, obliques and multifidus/quadratus lumborum co-contract. breathing changes this pressure, and these muscles must work simultaneously to maintain this pressure. however, increasing thoracic expansion (contracting the intercostals to expand the ribs laterally) means you can get air in with less disruption to intra-abdominal pressure. this in turn reduces the effort needed to maintain balance.
the hips and knees are stacked over the middle of the hand to continue the straight line from shoulders to feet.
hypothetically, the most energy efficient handstand is one where your entire body is in a straight line, and movement occurs only at the wrist. less energy spent on balancing means you can hold longer and work towards harder progressions.
the hypothetical “perfect” handstand is just that, hypothetical. a more pragmatic training focus is getting your centre of mass balanced over the middle of your hands, and creating stability in your shoulders, core and hips to reduce the amount of work your wrists need to do.
these goals inform the base ingredients of a handstand training program: alignment drills, shoulder mobility, wrist, shoulder & core strengthening, and fun.
alignment drills – creating the straight line needed for a handstand requires full body strength. practicing this shape on the means when you do get upside down, it will take less time and energy to find it. muscle memory is your friend!
here are some awesome drills from circus performer ellen henry
shoulder mobility – to get the open shoulder position requires a good deal of mobility. having sufficient length in the lats to elevate and externally rotate the shoulder is crucial (and difficult!) mobility is a combination of strength and flexibility – drills where you actively move through your full available range help develop both.
wrist strengthening – once you get the position, strong wrists will allow you to balance your bodyweight over your hands and stop you falling. palm and finger pulses are essential handstand conditioning, demonstrated here:
shoulder strengthening – to create a stable position, you will need your shoulder to have strength in end range external rotation, protraction and upward rotation.
core strengthening – strengthening your deep core and pelvic floor will allow you to control your spine in a handstand. pilates is fantastic for this. practice thoracic expansion by putting your hands on your ribcage, and letting them move sideways as you breathe in.
engaging your core in this way may feel weird or frustrating, and takes practice! be gracious with yourself and remember that you are asking your brain and body to learn something totally new!
fun! – handstands are hard work and take many years to master (think how long it takes babies to learn to walk). if you only do boring drills you will soon hate handstand training and stop doing it. find progressions that feel fun and rewarding. it might be helpful for you to have an outcome measure (eg taking a photo of your position against a wall, or time spent balancing) to remind yourself of your improvements. if you chase a moving target you will quickly feel disheartened.
remember that progress is not linear. small and consistent efforts are the key to progress, but there will always be setbacks. sustainability and enjoyment will help you keep coming back to your practice.
happy handstanding!
